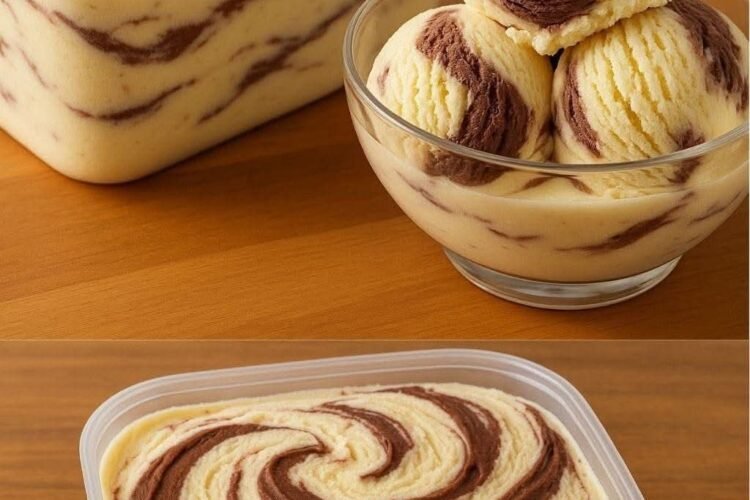
Nothing beats a scoop of homemade ice cream, especially when it has a creamy vanilla base with ribbons of rich chocolate running through every bite. This no-churn vanilla chocolate swirl ice cream is incredibly easy to make and requires no ice cream maker, complicated custard, or special equipment.
The secret is a simple combination of cold heavy cream and sweetened condensed milk. The cream is whipped until thick and fluffy, then gently combined with vanilla and condensed milk to create a rich, smooth base. A silky mixture of melted chocolate and cream is layered throughout before everything goes into the freezer.
After a few hours of chilling, you have a beautiful homemade dessert with a luxurious texture and plenty of classic vanilla and chocolate flavor.
It’s the kind of dessert that feels special enough for a celebration but simple enough to make when you’re craving something sweet on a warm afternoon.
Why You’ll Love This Recipe
There are plenty of reasons to keep this easy ice cream recipe handy.
- No ice cream maker required
- Only a handful of ingredients
- Rich and creamy texture
- Classic vanilla and chocolate combination
- Easy to prepare ahead
- Simple to customize with your favorite mix-ins
The chocolate swirl also makes every scoop look beautiful. Instead of mixing the chocolate completely into the vanilla base, gentle swirling creates ribbons of chocolate that remain visible throughout the ice cream.
Ingredients
For the Vanilla Ice Cream
- 2 cups (480 ml) heavy cream, very cold
- 1 can (14 ounces / 397 g) sweetened condensed milk, very cold
- 1 teaspoon pure vanilla extract
For the Chocolate Swirl
- 4 ounces (113 g) good-quality semi-sweet or dark chocolate, finely chopped
- 2 tablespoons heavy cream
For the best flavor, choose a chocolate bar rather than relying on chocolate chips. Semi-sweet or dark chocolate provides a pleasant contrast to the sweet vanilla base.
How to Make No-Churn Vanilla Chocolate Swirl Ice Cream
1. Chill Your Equipment
Before you begin, place your large mixing bowl and whisk attachment or beaters in the freezer for about 15 to 20 minutes.
This simple step helps the heavy cream whip more efficiently and hold its shape.
Make sure your heavy cream and sweetened condensed milk are also very cold.
2. Whip the Heavy Cream
Pour the cold heavy cream into the chilled mixing bowl.
Start beating at medium-low speed and gradually increase the speed to high. Continue whipping until the cream forms stiff peaks.
To test it, lift the whisk from the cream. The peak should stand firmly without immediately falling over.
Be careful not to continue whipping once you’ve reached this stage. Over-whipping can cause the cream to become grainy and eventually separate into butter.
3. Add the Condensed Milk and Vanilla
Pour the cold sweetened condensed milk into the whipped cream.
Add the vanilla extract.
Using a rubber spatula, gently fold everything together. Work slowly and carefully because you want to preserve the air that was incorporated into the whipped cream.
Continue folding just until the mixture is smooth and evenly combined.
You now have your creamy vanilla ice cream base.
4. Make the Chocolate Swirl
Place the finely chopped chocolate and 2 tablespoons of heavy cream in a microwave-safe bowl.
Microwave in 20-second intervals, stirring well after each interval. Continue until the chocolate has melted completely and the mixture is smooth.
You can also melt the chocolate and cream using a double boiler if you prefer.
Allow the chocolate mixture to cool for a few minutes. It should remain fluid enough to drizzle but should not be hot.
This is important because hot chocolate can melt the whipped cream mixture and affect the final texture.
5. Layer the Ice Cream
Choose a freezer-safe container. A loaf pan or shallow rectangular freezer container works especially well.
Spoon about one-third of the vanilla mixture into the container and spread it into an even layer.
Drizzle approximately one-third of the melted chocolate mixture over the top.
Add another third of the vanilla base, followed by another layer of chocolate.
Finish with the remaining vanilla mixture and the rest of the chocolate.
6. Create the Chocolate Swirl
Now comes the fun part.
Take a butter knife, skewer, or the handle of a spoon and gently move it through the layers in broad S-shaped motions.
Don’t stir too much.
The goal isn’t to completely combine the chocolate and vanilla. You want distinct ribbons of chocolate running through the creamy vanilla base.
A few gentle swirls are all you need.
7. Freeze
Cover the container tightly with a lid or plastic wrap.
Place it in the coldest part of your freezer and freeze for at least 6 to 8 hours.
For the best texture, let it freeze overnight.
Avoid opening the freezer repeatedly while the ice cream is setting because temperature changes can encourage ice crystal formation.
8. Serve
When you’re ready to serve, remove the ice cream from the freezer and let it sit at room temperature for approximately 5 to 10 minutes.
This short resting period makes the ice cream easier to scoop and gives it a smoother, creamier texture.
Scoop into bowls, cones, or waffle cones and serve immediately.
Tips for Creamy No-Churn Ice Cream
Keep everything cold. Cold heavy cream whips better and creates a more stable base.
Don’t over-whip the cream. Stop as soon as stiff peaks form.
Fold gently. Aggressive stirring can knock the air out of the whipped cream and make the finished ice cream denser.
Let the chocolate cool. The chocolate should be pourable but not hot when added to the ice cream.
Don’t over-swirl. Too much mixing will turn the beautiful vanilla-and-chocolate ribbons into a uniform brown mixture.
Use quality chocolate. Since there are only a few ingredients in this recipe, the flavor of the chocolate really stands out.
Freeze long enough. Give the ice cream at least six hours to become firm, although overnight freezing is ideal.
Delicious Variations
Mint Chocolate Ice Cream
Add about ½ teaspoon peppermint extract to the vanilla mixture. You can also use chopped mint chocolate for an extra layer of flavor.
Mocha Chocolate Swirl
For a coffeehouse-inspired version, dissolve 1 to 2 tablespoons instant espresso powder in a small amount of hot water. Let it cool completely, then fold it into the vanilla base.
Peanut Butter Swirl
Warm about ½ cup creamy peanut butter until slightly runny. Drizzle it between layers of vanilla ice cream and chocolate for a rich peanut butter cup-inspired dessert.
Chocolate Cookie Ice Cream
Add crushed chocolate sandwich cookies between the layers before freezing. The cookies soften slightly while maintaining a delicious chocolate crunch.
Caramel Chocolate Swirl
Replace part of the chocolate drizzle with cooled caramel sauce. You can even use both for a decadent chocolate-caramel combination.
Berry Swirl
For a fruity version, cook fresh or frozen berries with a little sugar until thick. Cool completely before swirling the fruit mixture into the vanilla base.
How to Store Homemade Ice Cream
Transfer the finished ice cream to an airtight, freezer-safe container.
If your container doesn’t have a tight-fitting lid, press plastic wrap directly against the surface of the ice cream before covering it. This helps limit air exposure and reduces the chance of freezer burn.
Store the ice cream toward the back of the freezer, where the temperature is generally more stable than near the door.
For the best texture and flavor, enjoy homemade no-churn ice cream within approximately 2 to 3 weeks.
Try to avoid repeatedly allowing the entire container to soften and then refreezing it. Repeated thawing and freezing can create larger ice crystals and make the texture less creamy.
Frequently Asked Questions
Why is my no-churn ice cream icy?
Ice crystals can develop when the mixture is exposed to air or experiences repeated temperature changes. Make sure the container is tightly covered and freeze the ice cream in a consistently cold part of your freezer.
Can I make this without an electric mixer?
Yes. You can whip the cream by hand with a sturdy whisk, although it requires considerably more effort. Using a chilled bowl and very cold cream will make the process easier.
What chocolate should I use?
Semi-sweet or dark chocolate works especially well. A chocolate bar with around 60–70% cacao provides a rich flavor without making the dessert overwhelmingly sweet.
Can I use milk chocolate?
Yes, but keep in mind that milk chocolate is sweeter and has a softer flavor. If you prefer a sweeter, more dessert-like chocolate swirl, it can be a delicious option.
How do I make the ice cream easier to scoop?
Let it sit at room temperature for about 5 to 10 minutes before serving. You can also dip your ice cream scoop in warm water, then shake off the excess water before scooping.
How long does homemade ice cream need to freeze?
For this recipe, allow at least 6 to 8 hours. Freezing overnight gives the best opportunity for the ice cream to become firm and scoopable.
Nutrition Information
Approximate nutrition per serving, based on 8 servings:
- Calories: 420 kcal
- Protein: 5 g
- Carbohydrates: 38 g
- Fat: 29 g
- Fiber: 1 g
- Sodium: 80 mg
Nutrition information is an estimate and can vary depending on the specific ingredients and brands used.
Final Thoughts
This no-churn vanilla chocolate swirl ice cream is proof that homemade dessert doesn’t have to be complicated. With just a few ingredients and no ice cream maker, you can create a rich, creamy frozen treat with beautiful chocolate ribbons running through every scoop.
The combination of sweet vanilla, smooth cream, and deep chocolate is timeless, while the simple no-churn method makes the recipe accessible to almost any home cook.
Make a batch ahead of a family dinner, keep it ready for a weekend treat, or customize it with cookies, caramel, nuts, coffee, or your favorite flavors. Once you see how easy homemade ice cream can be, you may never look at store-bought ice cream quite the same way again.