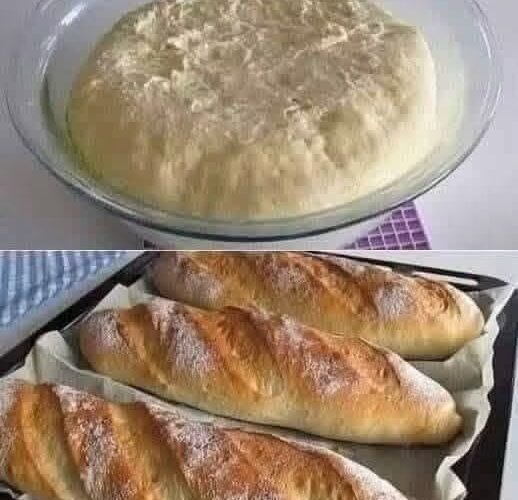
There’s something incredibly satisfying about pulling a warm loaf of homemade bread from the oven. The golden crust, soft center, and comforting aroma can make even an ordinary kitchen feel special. And while baking yeast bread may seem intimidating at first, this easy homemade bread recipe is simple enough for beginners and reliable enough to make again and again.
Made with everyday ingredients like all-purpose flour, yeast, salt, sugar, water, and butter, this bread doesn’t require complicated equipment or unusual ingredients. A little kneading and patience are all you need to create a soft, flavorful loaf that’s perfect for sandwiches, toast, breakfast, or serving alongside dinner.
Once you get comfortable with the basic method, you can easily customize the loaf with herbs, seeds, cheese, or other favorite additions.
Why You’ll Love This Homemade Bread
This recipe is designed to keep homemade bread approachable.
The dough comes together with simple pantry staples, and the two rising periods help create a light, tender texture. The butter adds richness, while a small amount of sugar helps balance the flavor and supports the yeast.
You also have the option of adding honey or olive oil for a slightly different flavor and texture.
Freshly baked bread is wonderful on its own, but it becomes even better when spread with butter or used to make your favorite sandwich.
Ingredients
For one standard loaf, you’ll need:
- 3½ to 4 cups all-purpose flour
- 1 packet active dry yeast (2¼ teaspoons)
- 1½ teaspoons salt
- 1 tablespoon granulated sugar
- 1¼ cups warm water, about 110°F (45°C)
- 2 tablespoons unsalted butter, softened
- Optional: 1 tablespoon honey or olive oil
A Note About the Flour
Start with 3½ cups of flour rather than adding the full 4 cups immediately. Depending on humidity, flour brand, and measuring technique, you may need slightly more or less.
The finished dough should feel soft and slightly tacky but shouldn’t be so sticky that it coats your hands excessively.
Adding too much flour can make the finished loaf dense, so add extra flour gradually.
How to Make Homemade Bread
Step 1: Activate the Yeast
Pour the warm water into a small bowl. Add the sugar and active dry yeast, then stir gently.
Let the mixture stand for about 5 minutes.
The yeast should begin to foam or look bubbly on the surface. This indicates that the yeast is active and ready to use.
The temperature of the water matters. Water that’s too hot can damage the yeast, while water that’s too cool may slow activation.
If the mixture doesn’t show any signs of activity after several minutes, check the expiration date of your yeast and consider starting again with a fresh packet.
Step 2: Combine the Dry Ingredients
In a large mixing bowl, whisk together 3½ cups of flour and the salt.
Mixing the salt evenly into the flour helps distribute it throughout the dough.
Make a small well in the center of the flour mixture. This gives you a convenient place to add the yeast mixture and butter.
Step 3: Form the Dough
Pour the activated yeast mixture into the well.
Add the softened butter and, if desired, the honey or olive oil.
Using a wooden spoon or clean hands, mix everything together until a rough, shaggy dough forms.
At first, the dough may look uneven and slightly sticky. That’s completely normal.
Once the ingredients are mostly combined, transfer the dough to a lightly floured work surface.
Step 4: Knead the Dough
Knead the dough for approximately 5 to 7 minutes.
Push the dough away from you with the heel of your hand, fold it back toward yourself, rotate it slightly, and repeat.
As you knead, the dough should gradually become smoother and more elastic.
If it feels excessively sticky, add a small amount of flour at a time. Avoid adding large amounts all at once because too much flour can produce a heavy loaf.
A properly kneaded dough should feel soft, smooth, and elastic.
First Rise: Let the Dough Rise
Lightly grease a large bowl with a little oil.
Place the kneaded dough inside and turn it once so the surface has a thin coating of oil.
Cover the bowl with plastic wrap or a clean damp towel.
Place it somewhere warm and free from drafts and let it rise for approximately 1 hour, or until it has roughly doubled in size.
The exact rising time can vary depending on the temperature of your kitchen. A warmer environment generally allows the dough to rise faster, while a cooler room may require additional time.
Don’t worry if your dough takes longer than an hour. Look at its size rather than relying only on the clock.
Shape the Loaf
Once the dough has doubled, gently press it down to release some of the accumulated air.
Transfer it to a lightly floured surface.
For a traditional sandwich loaf, shape the dough into a loaf that fits comfortably into a greased 9×5-inch loaf pan.
You can also make a rustic round loaf. Shape the dough into a smooth ball and place it on a parchment-lined baking sheet.
Cover the shaped dough again and let it rest for approximately 30 minutes.
This second rise helps create a lighter texture and gives the dough time to relax after shaping.
Bake the Bread
Step 1: Preheat the Oven
While the dough completes its second rise, preheat your oven to 375°F (190°C).
Make sure the oven is fully heated before placing the bread inside.
Step 2: Bake
Place the risen dough in the oven and bake for approximately 25 to 30 minutes.
The bread should develop a beautiful golden-brown crust.
Another useful test is to gently tap the top. A properly baked loaf should sound somewhat hollow.
If you use an instant-read thermometer, the center of the loaf should reach approximately 190°F (88°C).
Keep in mind that ovens can vary, so use these signs together rather than depending exclusively on the baking time.
Step 3: Cool Before Slicing
Remove the bread from the oven and let it cool in the pan for about 10 minutes.
Then carefully transfer it to a wire rack.
Allow it to cool completely before slicing.
It can be tempting to cut into a hot loaf immediately, but allowing the bread to cool gives the interior time to finish setting. Cutting too early can result in a gummy or compressed center.
Tips for Perfect Homemade Bread
Knead Properly
Kneading develops gluten, which gives yeast bread its structure and helps create a pleasantly chewy texture.
You don’t need to knead aggressively. Consistent folding and pressing for several minutes is enough.
Pay Attention to the Dough
The dough itself is a better guide than a precise flour measurement.
If it is extremely sticky, gradually add flour. If it feels dry and difficult to work with, it may need a tiny amount of additional moisture.
Give the Dough Enough Time
Rising times aren’t always exact. Temperature, humidity, and yeast activity can all affect how quickly dough rises.
Wait until the dough has visibly expanded rather than rushing the process.
Don’t Overload the Dough
If you’re adding extras such as herbs, shredded cheese, or seeds, keep the quantity moderate.
About ¼ cup of additions is a good starting point. Add them after the dough has been kneaded and developed.
Easy Flavor Variations
Once you’ve mastered the basic loaf, you can experiment with different flavors.
Add dried Italian herbs and a little garlic powder for a savory loaf.
For a cheesy version, fold shredded cheddar, mozzarella, or another melting cheese into the dough.
Sunflower seeds, sesame seeds, pumpkin seeds, or flaxseed can provide extra texture.
For a slightly sweeter loaf, use the optional honey and add a little cinnamon for a breakfast-style variation.
How to Store Homemade Bread
Homemade bread doesn’t contain the preservatives found in many packaged loaves, so proper storage is important.
Once completely cool, keep the bread at room temperature in a breathable cloth or paper bag for up to about 3 days.
Avoid sealing warm bread in an airtight container because trapped moisture can soften the crust and encourage spoilage.
For longer storage, wrap the loaf tightly and freeze it. You can freeze the whole loaf or slice it first so individual pieces are easy to remove when needed.
Frequently Asked Questions
Can I use instant yeast?
Yes. Instant yeast can generally be used in place of active dry yeast, although the preparation method may differ slightly depending on the brand.
Why didn’t my dough rise?
The yeast may have been inactive, the water may have been too hot or too cold, or the room may simply be too cool. Give the dough additional time in a warm, draft-free location.
Can I make this bread without a loaf pan?
Absolutely. Shape the dough into a round loaf and bake it on a parchment-lined baking sheet.
Why is my homemade bread dense?
Too much flour, insufficient kneading, inadequate rising time, or inactive yeast can all contribute to dense bread.
Can I freeze homemade bread?
Yes. Once completely cooled, wrap the bread tightly and freeze it for longer storage. Slicing it before freezing makes it convenient to use one piece at a time.
Final Thoughts
Making homemade bread doesn’t have to be complicated. With a handful of basic ingredients, a little kneading, and enough time for the dough to rise, you can create a beautiful loaf with a golden crust and soft, tender center.
This easy homemade bread recipe is a wonderful starting point for anyone learning to bake yeast bread. Once you master the basic method, feel free to experiment with herbs, cheese, seeds, or other favorite flavors.
Whether you serve it warm with butter, turn it into sandwiches, or simply toast a slice for breakfast, homemade bread has a way of making everyday meals feel a little more special.