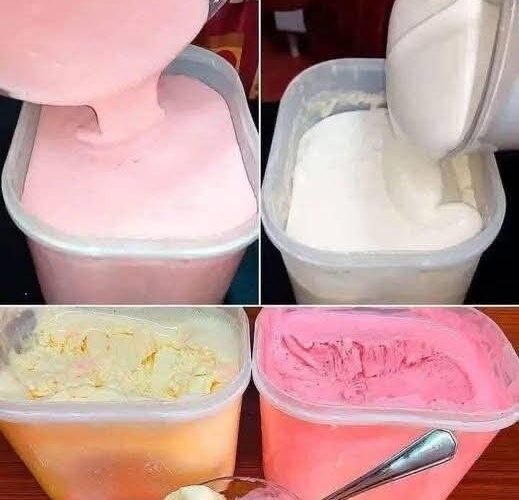
There’s something extra special about homemade ice cream, especially when you can make it without an ice cream maker. This no-churn strawberry vanilla swirl ice cream combines a rich, creamy vanilla base with bright strawberry puree for a beautiful pink-and-white marbled dessert.
The recipe uses just a handful of simple ingredients and doesn’t require churning, rock salt, or any specialized equipment. Instead, cold heavy cream is whipped until fluffy, then folded together with sweetened condensed milk and vanilla. Half of the mixture is blended with fresh strawberry puree, and the two flavors are gently swirled together before going into the freezer.
The result is smooth, creamy, fruity, and incredibly satisfying.
Whether you’re preparing dessert for a summer barbecue, family gathering, birthday celebration, or simply looking for an easy frozen treat, this homemade strawberry ice cream is an excellent choice.
Why You’ll Love This Ice Cream
This recipe is designed to make homemade ice cream simple.
- No ice cream maker required
- Only a few ingredients
- Creamy and smooth texture
- Fresh strawberry flavor
- Beautiful pink-and-white swirls
- Easy to customize
- Perfect for making ahead
The combination of sweet vanilla and fresh strawberry is also incredibly versatile. You can serve it in cones, bowls, waffle cones, or alongside brownies and warm desserts.
Ingredients
For the Ice Cream Base
- 2 cups (480 ml) heavy cream, very cold
- 1 can (14 ounces / 397 g) sweetened condensed milk, chilled
- 1 teaspoon pure vanilla extract
- ½ cup (120 ml) strawberry puree
- Optional: A few drops of red or pink food coloring
For the best results, use full-fat heavy cream and regular full-fat sweetened condensed milk. The richness of these ingredients is important for achieving the creamy texture that makes no-churn ice cream so appealing.
Making the Strawberry Puree
You can make the strawberry puree using approximately 6 to 8 fresh or frozen strawberries.
If using fresh strawberries, wash them, remove the green tops, and puree them in a blender or food processor. For an especially smooth ice cream, strain the puree through a fine-mesh sieve to remove most of the seeds.
If using frozen strawberries, thaw them completely before pureeing.
How to Make No-Churn Strawberry Vanilla Ice Cream
1. Chill Everything
Before you start, make sure the heavy cream is very cold and the sweetened condensed milk has been chilled.
For an even better result, place your mixing bowl and beaters or whisk attachment in the freezer for about 15 minutes.
Cold equipment helps the heavy cream whip faster and hold its shape.
2. Whip the Heavy Cream
Pour the cold heavy cream into your chilled mixing bowl.
Using a hand mixer or stand mixer, begin beating at medium speed and gradually increase to medium-high.
Continue whipping until the cream reaches stiff peaks.
When you lift the beaters, the whipped cream should hold its shape firmly.
Be careful not to overbeat. If you continue whipping for too long, the cream can become grainy and eventually start turning into butter.
3. Mix the Condensed Milk and Vanilla
In another bowl, combine the chilled sweetened condensed milk with the vanilla extract.
Stir gently until well combined.
This mixture provides the sweetness and rich flavor for the ice cream base.
4. Combine the Two Mixtures
Add approximately one-third of the whipped cream to the condensed milk mixture.
Gently fold it together with a rubber spatula. This first addition helps lighten the condensed milk mixture, making it easier to combine with the remaining whipped cream.
Add the rest of the whipped cream.
Continue folding gently until there are no obvious streaks of whipped cream remaining.
Don’t stir aggressively. The air incorporated into the whipped cream is what gives this no-churn ice cream its light and creamy texture.
5. Create the Strawberry Base
Divide the finished vanilla ice cream mixture evenly between two bowls.
Leave one portion plain for the vanilla layer.
Add the strawberry puree to the second portion.
Gently fold until the strawberry puree is evenly distributed and the mixture has a beautiful pink color.
If you’d like a brighter pink shade, add a few drops of red or pink food coloring.
The food coloring is completely optional. The strawberry puree will naturally give the ice cream a soft pink color.
6. Layer the Two Flavors
Prepare a freezer-safe container. A loaf pan or shallow airtight container works particularly well.
Start by spooning alternating portions of the vanilla and strawberry ice cream mixtures into the container.
You don’t need to make perfect layers. Random dollops create a more natural marbled appearance.
Continue alternating the two mixtures until the container is filled.
7. Make the Swirl
Take a butter knife or skewer and gently move it through the ice cream.
Make a few broad S-shaped or figure-eight motions.
Don’t overdo it.
The goal is to create visible ribbons of pink strawberry running through the white vanilla base. If you swirl too much, the two colors will completely blend together.
8. Freeze
Cover the container tightly with a lid or plastic wrap.
Place it in the freezer for at least 6 hours.
For the firmest and creamiest results, freezing overnight is recommended.
Try to place the container toward the back of the freezer, where the temperature is usually more stable.
9. Serve
When you’re ready to enjoy the ice cream, remove it from the freezer and let it sit at room temperature for approximately 5 to 10 minutes.
This short resting period allows the ice cream to soften slightly, making it much easier to scoop.
Serve in bowls or cones and enjoy immediately.
Tips for the Creamiest No-Churn Ice Cream
Keep the cream cold. Very cold heavy cream whips much more effectively.
Don’t over-whip. Stop as soon as stiff peaks form.
Fold gently. Mixing too aggressively can remove the air from the whipped cream.
Strain the strawberry puree. If you prefer an ultra-smooth texture, remove the strawberry seeds before adding the puree.
Cool your ingredients. The condensed milk should be chilled before being mixed with the whipped cream.
Don’t over-swirl. A few gentle passes with a knife are enough to create the beautiful marbled effect.
Use an airtight container. This helps prevent ice crystals and freezer burn.
Give it enough time to freeze. Although six hours is usually sufficient, overnight freezing produces the best consistency.
Easy Variations
Classic Vanilla
For simple vanilla ice cream, leave out the strawberry puree and add another teaspoon of vanilla extract.
Chocolate Strawberry
Melt about ½ cup chocolate chips and allow them to cool slightly. Add some to the vanilla mixture or drizzle it between the strawberry and vanilla layers.
Strawberry Cheesecake
Add crushed graham crackers and small pieces of cream cheese-style cheesecake filling between the layers for a cheesecake-inspired dessert.
Chocolate Chip Strawberry
Sprinkle mini chocolate chips throughout the ice cream before freezing. Chocolate and strawberries make a naturally delicious combination.
Raspberry Vanilla
Replace the strawberry puree with strained raspberry puree for a slightly more tart berry flavor.
Mango Vanilla
Use mango puree instead of strawberry for a tropical variation. Make sure the puree is thick rather than watery.
Coffee Ice Cream
For a coffee version, dissolve about 2 tablespoons instant espresso powder in 1 tablespoon hot water. Allow it to cool completely, then stir it into the condensed milk mixture.
How to Store Homemade Ice Cream
Store your ice cream in an airtight, freezer-safe container.
If you’re using a loaf pan without a tight-fitting lid, press plastic wrap directly against the surface of the ice cream before covering the pan. You can then add another layer of foil for extra protection.
Proper covering helps prevent air and moisture from reaching the ice cream, which can cause freezer burn and unwanted ice crystals.
For the best quality, enjoy the homemade ice cream within approximately 2 to 3 weeks.
Although it can remain frozen longer, the texture may gradually become less creamy.
Avoid repeatedly allowing the entire container to melt and then refreezing it. Repeated temperature changes encourage larger ice crystals to form.
Frequently Asked Questions
Why did my no-churn ice cream turn icy?
The most common causes are insufficiently whipped cream, overmixing, or poor storage. Make sure the cream reaches stiff peaks and fold the ingredients together gently. Keeping the finished ice cream tightly covered also helps prevent ice crystals.
Can I use low-fat cream?
Full-fat heavy cream is strongly recommended. The fat helps create the rich, creamy texture needed for no-churn ice cream. Lower-fat substitutes can produce a softer or icier result.
How long does no-churn ice cream take to freeze?
It generally needs at least 6 hours, but freezing it overnight for approximately 8 to 12 hours is ideal.
Can I use frozen strawberries?
Yes. Thaw the strawberries completely, drain any excess liquid, and puree them before adding them to the ice cream.
Can I add fresh strawberry pieces?
Yes, but chop them into very small pieces. Large pieces of fresh fruit contain water that can freeze hard and become icy. You can also briefly cook the chopped strawberries with a little sugar to reduce their moisture before cooling them completely.
Why is my ice cream difficult to scoop?
Homemade ice cream can freeze quite firmly. Let it sit at room temperature for 5 to 10 minutes before scooping. A scoop dipped briefly in warm water can also help.
Nutrition Information
Approximate nutrition per serving:
- Calories: 350
- Protein: 5 g
- Carbohydrates: 38 g
- Fat: 22 g
- Fiber: 0 g
- Sodium: 80 mg
Nutrition information is an estimate and may vary depending on the ingredients and brands used.
Final Thoughts
This no-churn strawberry vanilla swirl ice cream is one of those desserts that looks far more complicated than it actually is. With cold heavy cream, sweetened condensed milk, vanilla, and strawberry puree, you can create a homemade frozen treat without an ice cream machine.
The creamy vanilla base provides the perfect backdrop for sweet, fruity strawberry flavor, while the gentle swirling creates a gorgeous pink-and-white pattern in every scoop.
Make it ahead for summer gatherings, serve it after a family dinner, or keep a container in the freezer whenever you’re craving something sweet. Once you discover how simple no-churn ice cream can be, you’ll have plenty of reasons to experiment with new flavors and swirls.