Easter Jell-O pie is my go-to spring dessert when I want something festive, colorful, and easy to make. With pastel layers, creamy texture, and a crunchy graham cracker crust, this pie delivers big visual impact without a complicated recipe. Whether you’re prepping for Easter brunch, a church gathering, or just a sunny weekend treat, this chilled, layered pie adds instant cheer to the table. In this article, I’ll show you how to get clean layers, offer fun flavor swaps, and answer the most common questions so your pie turns out picture-perfect and every bit as fun to eat as it is to serve.
Table of Contents :

The Story Behind My Easter Jell-O Pie
A Family Gathering Hit: My First Easter Jell-O Pie
I first made this Easter Jell-O pie last spring. I needed something bright, sweet, and kid-friendly for a family gathering and fast. My daughter Ellie had just turned six, and she requested “a rainbow pie that jiggles.” Challenge accepted. I remembered a church friend’s pastel Jell-O salad from childhood and decided to turn that memory into a sliceable dessert. It had to be safe for Ellie (gluten-free), look magical, and hold together well for slicing. The result? A creamy, three-layer pie that had my niece clapping and the adults asking, “Wait, there’s cream cheese in this?”
It quickly earned a spot in our family’s holiday rotation, right between my gluten-free carrot cake and deviled eggs.
Print
Easter Jell-O Pie
- Total Time: 4 hours 45 minutes
- Yield: 1 9-inch pie (8 servings) 1x
Description
A colorful no-bake Easter Jell-O pie with creamy layers and a gluten-free graham cracker crust. Perfect for spring brunch or family gatherings.
Ingredients
1 pre-made gluten-free graham cracker crust
1 package lemon Jell-O
1 package berry blue Jell-O
1 package grape Jell-O
1½ cups boiling water (divided)
12 oz cream cheese, softened
8 oz Cool Whip or whipped topping
Pastel sprinkles and candy eggs for decoration
Instructions
1. Dissolve lemon Jell-O in ½ cup boiling water. Mix with 4 oz cream cheese and ⅓ of the Cool Whip until smooth.
2. Pour into crust and chill 30 minutes.
3. Repeat with berry blue Jell-O and second portion of cream cheese and Cool Whip. Pour gently over the first layer and chill 30 minutes.
4. Repeat with grape Jell-O and remaining cream cheese and topping. Add final layer and chill at least 4 hours or overnight.
5. Top with whipped cream, candy eggs, and sprinkles before serving.
6. Slice with hot knife for clean layers.
Notes
Use dairy-free alternatives if needed.
Substitute crust or Jell-O flavors as desired.
Store in fridge for up to 3 days.
- Prep Time: 15 minutes
- Cook Time: 0 minutes
- Category: Dessert
- Method: No-Bake
- Cuisine: American
Nutrition
- Serving Size: 1 slice
- Calories: 210
- Sugar: 18g
- Sodium: 135mg
- Fat: 10g
- Saturated Fat: 6g
- Unsaturated Fat: 2g
- Trans Fat: 0g
- Carbohydrates: 24g
- Fiber: 0g
- Protein: 3g
- Cholesterol: 25mg
Keywords: easter jell-o pie, layered gelatin pie, gluten-free Easter dessert
The Magic of Layers: Why This Pie Works
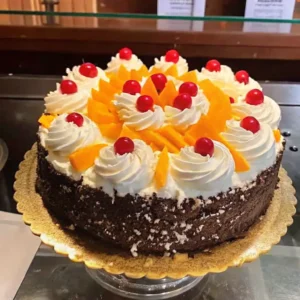
What makes this Easter Jell-O pie stand out is the layering trick. You blend each Jell-O flavor with softened cream cheese and whipped topping, which makes the layers mousse-like instead of wobbly. Pouring slowly over chilled layers keeps the colors distinct. Lemon on bottom, berry blue in the middle, grape on top , it’s like a cross-section of spring. And those colors? Pure joy on a plate.
I’ve since made it with a chocolate crust, added candy eggs on top, and once even did four layers. But this version remains my favorite. And yes, it’s always gluten-free , because joy should never come with a side of risk.
Key Ingredients & Smart Substitutions for Easter Jell-O Pie
Using Cool Whip Instead of Whipped Cream
When you’re short on time (or just want to simplify things), Cool Whip works beautifully in Easter Jell-O pie. It holds its structure well and blends effortlessly with cream cheese to give each layer a mousse-like consistency. If you prefer a less sweet version or want to keep it homemade, you can whip heavy cream with a little powdered sugar until soft peaks form. Just make sure whatever you use is cold , it helps keep each layer fluffy, not runny.

I’ve tested both, and honestly, Cool Whip is my standby for consistency. It’s a classic for a reason , easy, stable, and reliable. For a dairy-free version, you can use coconut whipped topping or a cashew-based cream .
Crust Options: Store-Bought or Homemade
Yes, you can absolutely use a pre-made graham cracker crust for Easter Jell-O pie. It saves time and still delivers the buttery crunch that plays so well with the creamy filling. Just double-check the label for gluten-free certification if needed , some brands sneak in wheat.


Want to make your own? Mix 1 ½ cups of gluten-free graham cracker crumbs with 6 tablespoons of melted butter and 2 tablespoons of sugar. Press into a 9-inch pie pan and bake at 350°F for 10 minutes. Let it cool completely before adding the first layer.
For a fun twist, try a chocolate crust . It gives a deeper flavor and contrasts nicely with fruity Jell-O.
Making Easter Jell-O Pie Pop With Color & Charm
Layering for Maximum Easter Magic
One of the most enchanting parts of Easter Jell-O pie is the pastel rainbow hidden inside every slice. To get that clean, layered effect, start with the lightest color on the bottom , usually lemon yellow , followed by something soft and springy like berry blue or strawberry, and finish with a bolder color like grape or cherry. Pour each layer gently over the back of a spoon to avoid breaking through the one below it.
Want your colors brighter? Use less whipped topping in each layer. Want them creamier? Add more. Just keep proportions consistent so the pie slices cleanly.
Each layer needs at least 30 minutes of chill time before the next goes on. It’s tempting to rush, but the key to a flawless easter jell-o pie is patience. I set a timer, clean up in between, and use the time to prep toppings or even get started on another dessert .
Decorating for Easter
When it comes to decorations, think fun and festive. Top your Easter Jell-O pie with a swirl of whipped cream, a sprinkle of pastel nonpareils, or a few candy eggs. Add them right before serving for the freshest look , especially if you’re using chocolate eggs or jelly beans, which can bleed if they sit too long.

If you want to go the extra mile, tint a bit of whipped cream with food coloring and pipe rosettes around the edge. Or use a cookie cutter to place a bunny or egg stencil on top and fill it with sprinkles.
For extra flair, serve each slice with a dollop of whipped cream and a side of fresh berries.
Technique Tips for a Perfect Easter Jell-O Pie
Chill Time Makes or Breaks the Pie
Let’s be clear , Easter Jell-O pie isn’t complicated, but it is all about timing. The biggest mistake I see? Not letting each layer chill enough before adding the next. You need at least 30 minutes in the fridge per layer. If you’re in a hurry, 10 minutes in the freezer can work , but watch closely so it doesn’t start to freeze or develop ice crystals.
Each layer should be just firm enough to support the next without mixing, but not so set that it repels the new layer. I gently touch the top with a clean finger before proceeding. It should feel springy but not sticky.
After the final layer, chill the whole pie for a minimum of 4 hours, preferably overnight. This ensures clean slices and that signature mousse-like bite that makes Easter Jell-O pie so satisfying.
When it’s finally time to serve, use a thin-bladed knife dipped in hot water and wiped clean between cuts. This prevents dragging colors and gives those neat, Instagram-worthy layers. I always use a metal pie server with a sharp edge to keep the crust intact , especially if I’m using a homemade one.
And don’t forget the presentation. A slice of Easter Jell-O pie is already visually impressive, but placing it on a white plate with a few fresh berries or a mint leaf takes it over the top.
Want to turn this pie into single-serve cuties? Try making mini versions in small jars or cupcake liners. I do this often , and they’re a hit at kids’ parties or brunch buffets.
Frequently Asked Questions :
Can I use Cool Whip instead of whipped cream?
Yes, Cool Whip is perfect for Easter Jell-O pie. It gives the layers a stable, fluffy texture and holds up well during chilling and slicing. Just make sure it’s fully thawed before mixing so your layers stay smooth.
Can I use a pre-made graham cracker crust?
Absolutely. A store-bought gluten-free graham cracker crust works great for Easter Jell-O pie, especially when you’re short on time. Just make sure it’s labeled gluten-free if needed. You can also make your own for a more homemade feel.
How can I make this pie more vibrant for Easter?
To make your Easter Jell-O pie more vibrant, use bold Jell-O flavors like lemon, berry blue, and grape, and adjust the amount of whipped topping in each layer. Less topping means more intense color. Finish with pastel sprinkles or candy eggs for a festive look.
Can I use different Jell-O flavors?
Yes! You can mix and match any flavors you like. Lime, orange, and raspberry make fun spring alternatives. Just keep the layering order in mind lighter colors go on the bottom for the best effect.
Why does my pie need to be chilled between layers?
Chilling each layer of your Easter Jell-O pie prevents the colors from blending. If you skip this step, the layers can run together, ruining the clean visual. Think of it as building a pie one step at a time , it’s worth the wait!
Conclusion
This Easter Jell-O pie has become a cherished part of our spring celebrations , a dessert that’s just as joyful to look at as it is to eat. With a simple graham cracker crust, creamy fruit layers, and festive decorations, it captures everything I love about Easter: color, flavor, and family. Whether you’re baking with kids, hosting a brunch, or simply looking for something light and nostalgic, this pie delivers. It’s easy to customize with flavors, colors, and toppings , just don’t skip the chill time! From my kitchen in Asheville to yours, happy Easter and happy baking.
Want more delicious Treats ? Join me on Facebook and Pinterest for mouthwatering recipes, helpful tips, and plenty of baking inspiration!