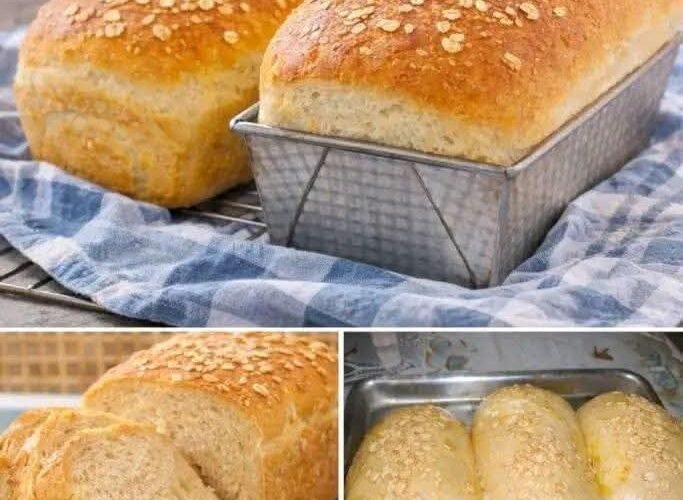
There’s something special about a loaf of homemade white bread fresh from the oven. The golden crust, soft center, and comforting aroma can make an ordinary kitchen feel like a cozy farmhouse bakery. This Amish White Bread recipe is a wonderful choice when you want a classic homemade loaf without complicated ingredients or fancy equipment.
Made with simple pantry staples like warm milk, yeast, butter, sugar, salt, and all-purpose flour, this bread has a tender crumb and lightly golden crust. It is soft enough for sandwiches, sturdy enough for toast, and delicious simply spread with butter and jam.
The secret to getting that perfect texture is giving the dough enough time to rise and kneading it properly without adding too much flour. Once you understand those two steps, homemade bread becomes much easier and more reliable.
Why You’ll Love This Amish White Bread
This recipe is perfect for beginners because the ingredients are simple and the method is straightforward. You don’t need a bread machine, and a stand mixer is completely optional.
The finished loaf is soft, slightly sweet, buttery, and wonderfully versatile. You can serve it alongside soups and stews, use it for sandwiches, make French toast, or simply enjoy a warm slice with butter.
It also freezes beautifully, making it a practical recipe to keep in your regular baking rotation.
Recipe Overview
Prep Time: About 20 minutes
First Rise: 1 to 1½ hours
Second Rise: 30–45 minutes
Bake Time: 30–35 minutes
Total Time: About 2½–3 hours
Yield: 1 loaf, approximately 12 slices
Oven Temperature: 375°F (190°C)
Ingredients
- 2¼ teaspoons active dry yeast (1 standard packet)
- ½ cup warm water, 105–115°F (40–46°C)
- 2 cups warm milk, 105–115°F (40–46°C)
- ⅓ cup granulated sugar
- ¼ cup unsalted butter, melted
- 1½ teaspoons salt
- 6–7 cups all-purpose flour, divided
- Butter or oil, for greasing the bowl and loaf pan
A Quick Note About the Flour
You may not need the entire 7 cups of flour. Flour absorbs liquid differently depending on the brand, humidity, and how it is measured. Add it gradually and stop when you have a soft dough that is slightly tacky but manageable.
Adding too much flour is one of the easiest ways to accidentally create a heavy, dry loaf.
How to Make Amish White Bread
1. Activate the Yeast
Start by combining the warm water with a small pinch of the sugar in a large mixing bowl. Sprinkle the active dry yeast over the surface.
Let the mixture sit for about 5–10 minutes.
The yeast should become foamy and bubbly. This is a sign that it is active and ready to use. If there is little or no activity, check that your yeast is fresh and that the water wasn’t too hot or too cold before starting again.
2. Add the Wet Ingredients
Once the yeast is activated, add the warm milk, remaining sugar, melted butter, and salt.
Stir gently until everything is combined.
The milk and water should feel comfortably warm rather than hot. Excessive heat can damage the yeast and prevent the dough from rising properly.
3. Add the Flour Gradually
Add about 3 cups of flour, one cup at a time, stirring after each addition.
At this stage, the mixture will look more like a thick batter than bread dough. Continue adding flour about ½ cup at a time until the mixture becomes a soft dough and begins pulling away from the sides of the bowl.
Remember, the goal isn’t to use a specific amount of flour. The goal is the correct dough consistency.
4. Knead the Dough
Transfer the dough to a lightly floured work surface.
Knead for approximately 8–10 minutes. Push the dough forward with the heels of your hands, fold it back toward you, rotate it, and repeat.
As you knead, the dough should gradually become smoother, more elastic, and less sticky.
If you’re using a stand mixer, attach the dough hook and knead on medium-low speed for about 6–8 minutes.
Try not to keep adding flour simply because the dough feels slightly sticky. A soft dough generally produces a lighter loaf.
5. Let the Dough Rise
Lightly grease a large clean bowl with butter or oil.
Place the kneaded dough into the bowl and turn it once so the surface is lightly coated. Cover the bowl with plastic wrap or a clean kitchen towel.
Let the dough rise somewhere warm and draft-free for about 1–1½ hours, or until it has approximately doubled in size.
A comfortable room temperature around 75–80°F (24–27°C) works well.
6. Shape the Loaf
Once the dough has doubled, gently press it down to release excess air.
Transfer it to a lightly floured surface and flatten it into a rough rectangle.
Starting from one of the longer sides, roll the dough tightly into a log. Pinch the seam closed and tuck the ends underneath to create a neat loaf.
7. Second Rise
Grease a 9×5-inch loaf pan with butter or oil.
Place the shaped dough into the pan with the seam facing down. Cover loosely and let it rise again for about 30–45 minutes.
The dough should become noticeably puffy and rise above the rim of the pan.
While it is finishing its second rise, preheat your oven to 375°F (190°C).
8. Score and Bake
For a classic rustic appearance, use a sharp knife or bread lame to make one shallow lengthwise cut across the top of the loaf.
Place the pan in the preheated oven and bake for 30–35 minutes.
The bread should have a beautiful golden-brown crust. For the most accurate test, use an instant-read thermometer. The center should reach approximately 200–210°F (93–99°C).
If the top becomes dark too quickly, loosely cover it with aluminum foil during the final 10–15 minutes.
9. Cool Completely
Remove the loaf from the pan immediately after baking and place it on a wire rack.
As tempting as it may be to slice into the bread right away, give it at least 1–2 hours to cool.
Cooling allows the interior structure to finish setting. Cutting the loaf while it is extremely hot can compress the crumb and leave you with a gummy center.
Tips for Perfect Homemade White Bread
Use fresh yeast. If your yeast doesn’t foam during activation, don’t continue with the recipe.
Watch your flour. Add it gradually rather than automatically using all 7 cups.
Give the dough enough time to rise. Rising time depends on room temperature, so use the dough’s appearance as your guide rather than relying only on the clock.
Don’t skip kneading. Proper kneading develops gluten, which gives the bread strength and structure.
Use an internal thermometer. Color is helpful, but temperature gives you a much better indication of doneness.
Delicious Variations
Honey Wheat Bread
Replace part of the all-purpose flour with whole wheat flour and substitute honey for the granulated sugar. This creates a slightly nuttier loaf with a heartier texture.
Garlic Herb Bread
Add minced garlic and a tablespoon or two of dried Italian herbs during the final few minutes of kneading for a savory version.
Cheddar Swirl Bread
After the first rise, flatten the dough into a rectangle and sprinkle shredded cheddar or Monterey Jack cheese over the surface. Roll it tightly, place it in the loaf pan, and continue with the second rise.
Richer Milk Bread
Whole milk creates a particularly tender and rich crumb. You can also use 2% milk for a slightly lighter texture.
How to Store Amish White Bread
Allow the loaf to cool completely before storing.
Keep it at room temperature in an airtight container, bread box, or resealable bag. It should stay soft and fresh for approximately 3–4 days.
Refrigerating homemade bread isn’t usually recommended because the cooler temperature can cause bread to stale more quickly.
For longer storage, freeze the bread for up to 3 months. You can freeze the entire loaf or slice it first. Wrap it tightly and place it in a freezer-safe bag.
Frozen slices can go directly into the toaster, making this an especially convenient option for busy mornings.
How to Get a Softer Crust
If you prefer a soft rather than crisp crust, brush the top of the freshly baked loaf with melted butter as soon as it comes out of the oven.
Avoid overbaking the bread, and remove it from the pan promptly after baking.
Frequently Asked Questions
Why is my Amish white bread dense?
Dense bread can result from inactive yeast, insufficient kneading, inadequate rising time, or too much flour. Make sure the yeast is active and allow the dough to truly double in size during both rises.
Can I prepare the dough the night before?
Yes. After shaping the dough and placing it in the greased loaf pan, cover it tightly and refrigerate it overnight for up to about 12–18 hours. The next day, allow it to warm up and complete its second rise before baking.
Can I use bread flour?
Yes. Bread flour can produce a slightly chewier loaf because it generally contains more protein. However, all-purpose flour works beautifully and gives this bread its characteristic soft texture.
How do I know when the bread is done?
The most reliable method is checking the center with an instant-read thermometer. It should register around 200–210°F. Without a thermometer, the loaf should be deeply golden and sound hollow when tapped on the bottom.
Serving Suggestions
This homemade white bread is incredibly versatile. Serve thick slices with butter and jam for breakfast, use it for classic sandwiches at lunch, or toast it and top it with eggs and avocado.
It is also wonderful alongside creamy soups, chili, stews, and roasted meats. Once the loaf starts getting slightly stale, turn it into French toast, bread pudding, croutons, or homemade breadcrumbs.
Final Thoughts
This easy Amish White Bread recipe proves that homemade bread doesn’t have to be complicated. With a handful of everyday ingredients, a little patience, and proper kneading and rising, you can create a soft, flavorful loaf with a beautiful golden crust.
The best part is the aroma that fills your kitchen while it bakes. Once you’ve made this loaf successfully, you may find yourself reaching for this recipe whenever you want fresh bread without making a trip to the store.
Serve it warm with butter, save a few slices for sandwiches, and freeze the rest for later. It’s a simple homemade staple that’s worth making again and again.