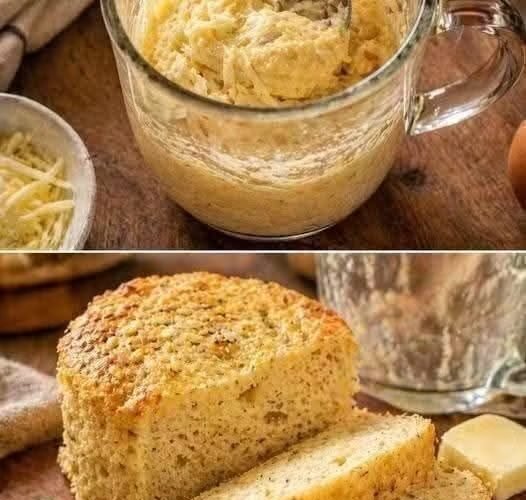
Craving warm homemade bread but don’t want to wait for yeast to rise or heat up the oven? This 90-Second Microwave Cheese Bread is one of the quickest ways to make a small batch of savory bread at home. Made with just a few simple ingredients, this soft little loaf comes together directly in a mug or ramekin and cooks in the microwave in about a minute and a half.
The recipe starts with a simple egg-based batter enriched with melted butter or olive oil, shredded cheese, baking powder, and a few optional seasonings. Once microwaved, the mixture puffs up into a light, tender bread that can be sliced and toasted for an even better texture.
It’s especially handy when you need a quick breakfast, an afternoon snack, or a simple bread substitute for a sandwich. And because the recipe makes only a small portion, there’s no need to prepare an entire loaf when you only want a couple of slices.
Why You’ll Love This Microwave Bread
There are plenty of reasons to try this easy homemade bread.
It’s incredibly fast. The microwave cooking time is only about 75 to 90 seconds.
No yeast is required. There’s no kneading, proofing, or waiting for dough to rise.
Small-batch friendly. You can make just enough bread for one person.
Easy to customize. Change the cheese, herbs, and seasonings to create different flavors.
Great toasted. While the bread is soft straight from the microwave, briefly toasting the slices gives them a delicious golden exterior.
Minimal cleanup. Everything can be mixed right in the mug or ramekin.
Ingredients You’ll Need
- 1 large egg – Let it come to room temperature if possible. It blends more easily with the other ingredients.
- 1 tablespoon melted butter or olive oil – Adds moisture and richness to the bread.
- 2 tablespoons shredded mozzarella or cheddar – Cheese contributes flavor and helps give the bread structure.
- ½ teaspoon baking powder – Provides the lift needed to make the bread puff up.
- 1 tablespoon grated Parmesan, optional – Adds a savory, slightly nutty flavor.
- ¼ teaspoon garlic powder – Optional, but excellent for a savory bread.
- ¼ teaspoon dried herbs – Oregano, rosemary, Italian seasoning, or another favorite herb can be used.
- A pinch of salt – Enhances the other flavors.
The ingredients are simple enough that you may already have everything in your kitchen.
Choosing the Right Container
The container you use can make a difference in the shape of your finished bread.
A standard microwave-safe mug works perfectly for convenience, but a wide-bottomed ceramic ramekin is even better if you want slices that resemble small English muffins or sandwich rounds.
A ramekin approximately 4 inches wide creates a flatter loaf that is easier to slice horizontally.
Whatever container you choose, make sure it is clearly labeled or known to be microwave-safe. Avoid containers with metallic decorations or trim.
How to Make 90-Second Microwave Cheese Bread
1. Grease Your Mug or Ramekin
Begin by lightly coating the inside of your microwave-safe mug or ramekin with butter or cooking spray.
Pay particular attention to the bottom and sides. This helps the cooked bread release more easily when you’re ready to remove it.
A wide-bottomed ramekin will give you a flatter shape, while a regular mug creates a taller mini loaf.
2. Mix the Egg and Butter
Crack the egg directly into the prepared container.
Add the melted butter or olive oil and whisk everything together with a fork until the egg is well blended.
If you’re using melted butter, make sure it isn’t extremely hot when you add it to the egg. Warm or slightly cooled melted butter is preferable.
3. Add the Dry Ingredients and Cheese
Add the baking powder, shredded mozzarella or cheddar, Parmesan if using, salt, garlic powder, and dried herbs.
Stir thoroughly with a fork until the ingredients are evenly distributed and you have a thick, uniform batter.
Make sure there are no obvious pockets of baking powder because you want the leavening to be evenly dispersed throughout the mixture.
4. Microwave the Bread
Place the mug or ramekin in the microwave.
Cook on high for 75 to 90 seconds.
The exact time can vary slightly depending on the microwave’s power and the shape of your container. The bread should puff noticeably while cooking.
Don’t be surprised if it rises above the rim. It should settle down somewhat after the cooking cycle ends.
5. Check for Doneness
Carefully remove the container from the microwave because it may be hot.
The bread should look set and firm rather than wet in the center. If the middle still appears undercooked, microwave it for another 10 to 15 seconds.
Try not to dramatically overcook it, however. Excessive microwave time can make an egg-based bread rubbery or dry.
6. Release and Cool
Allow the bread to sit for a minute or two.
Run a butter knife carefully around the edge to loosen it from the sides of the container. Turn the mug or ramekin upside down over a cutting board and gently release the bread.
Let it cool for another minute before slicing.
7. Slice and Toast
For the best eating experience, slice the mini loaf horizontally into 2 or 3 rounds.
You can eat the bread as it is, but toasting takes it to another level.
Heat a skillet over medium heat and add a small amount of butter. Place the slices cut-side down and toast until lightly golden and crisp around the edges.
The contrast between the tender center and buttery toasted surface makes this quick bread much more satisfying.
Chef’s Tips for Better Results
Use a Wide Ramekin for Sandwich-Style Bread
If you want recognizable round slices, a small wide ramekin is preferable to a tall coffee mug. The flatter shape makes slicing much easier.
Don’t Skip the Greasing Step
Even though the batter contains butter or oil, it can still stick to the container. A light coating of cooking spray or butter makes unmolding much simpler.
Watch the Cooking Time
Microwaves vary considerably in power. Start with 75 seconds and check the bread. If necessary, continue cooking in short intervals.
Toast It for Better Texture
Microwaved bread can have a soft texture that some people find slightly eggy. Toasting the slices in butter creates a golden exterior and gives the bread a more familiar toasted-bread texture.
Let It Cool Briefly
The bread continues to settle after cooking. Giving it a minute or two before slicing also makes it easier to handle.
How to Reduce an Eggy Flavor
Because this recipe uses one whole egg and no flour, it naturally has a slightly egg-rich character.
For a more savory flavor, add garlic powder and dried herbs such as oregano, rosemary, thyme, or Italian seasoning.
Parmesan is another easy way to increase the savory flavor.
Most importantly, toast the bread. Browning the slices in a skillet with a little butter adds another layer of flavor and helps reduce the noticeable egg aroma.
Easy Variations
Cheddar Garlic Bread
Use sharp cheddar with garlic powder and dried parsley. The stronger cheese creates a flavorful savory bite.
Italian Herb Bread
Try mozzarella with Parmesan, oregano, basil, and a small pinch of garlic powder.
Rosemary Parmesan Bread
Use mozzarella or cheddar and add Parmesan plus finely crushed dried rosemary for a fragrant savory version.
Peppery Cheese Bread
Add freshly ground black pepper along with cheddar and Parmesan for a slightly bolder flavor.
Olive Oil Version
Replace the butter with extra-virgin olive oil for a different flavor profile. The bread will still remain moist and tender.
Oven-Baked Alternative
If you don’t want to use a microwave, you can prepare the batter in an oven-safe ramekin instead.
Preheat the oven to 350°F (180°C). Grease the ramekin, add the batter, and bake for approximately 12 to 15 minutes, or until the bread is golden and feels firm when lightly touched in the center.
The oven method takes longer, but it can produce a slightly more evenly browned exterior.
Let the bread cool briefly before removing it from the ramekin.
What to Serve With Microwave Cheese Bread
This little bread is surprisingly versatile.
Serve the toasted slices with scrambled eggs for a quick breakfast, or use them as a base for a small breakfast sandwich.
They also pair nicely with:
- Cream cheese
- Avocado
- Fried or scrambled eggs
- Turkey or chicken slices
- Tomato and cucumber
- Soup
- Salad
- Butter and herbs
For a simple snack, warm a slice and spread it with butter while it’s still hot.
Storage Tips
Because this is a small egg-and-cheese bread, it is best enjoyed fresh and warm.
If you have leftovers, place the cooled bread in an airtight container and refrigerate it. When ready to eat, reheat it briefly and toast the slices in a skillet.
Avoid microwaving it for too long during reheating because it can become chewy.
Frequently Asked Questions
Can I make this bread without cheese?
Yes, but the cheese contributes both flavor and structure. If you leave it out, expect the texture and flavor to be somewhat different.
Why did my bread become rubbery?
The most common reason is overcooking. Microwave power varies, so start with the lower end of the suggested cooking time and add short intervals only when necessary.
Can I use a coffee mug?
Yes, provided the mug is microwave-safe and has enough room for the batter to expand.
What cheese works best?
Mozzarella and cheddar are both good choices. Parmesan can also be added for extra savory flavor.
Can I bake it instead of microwaving?
Yes. Bake the mixture in a greased oven-safe ramekin at 350°F (180°C) for approximately 12 to 15 minutes.
Final Thoughts
This 90-Second Microwave Cheese Bread is proof that homemade bread doesn’t always require yeast, kneading, or hours in the kitchen. With one egg, a little cheese, baking powder, and a few pantry staples, you can have a warm mini loaf ready in minutes.
For the best results, use a wide ramekin when possible, avoid overcooking, and give the finished bread a quick skillet toast before serving. Add garlic, herbs, Parmesan, or your favorite cheese to make the recipe your own.
When you want something warm, savory, and incredibly quick, this little microwave bread is an easy recipe worth remembering.