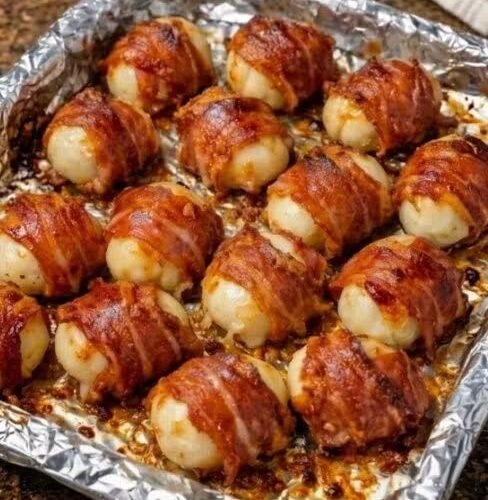
If you love juicy burgers, smoky barbecue sauce, crispy bacon, and plenty of melted cheese, these Cheddar-Stuffed BBQ Bacon Bombs are about to become a new favorite. Each bite starts with seasoned ground beef wrapped around a cube of cheddar cheese, then gets wrapped in bacon and brushed generously with BBQ sauce. As everything cooks together, the bacon becomes beautifully browned, the beef stays juicy, and the cheddar melts into an irresistible cheesy center.
These bacon bombs are especially fun because they look impressive without requiring complicated preparation. They’re perfect for game-day parties, backyard cookouts, casual family dinners, potlucks, or anytime you want something hearty and satisfying.
The best part? You can assemble them ahead of time and keep them refrigerated until you’re ready to bake. Serve them with extra BBQ sauce for dipping, and watch them disappear from the plate.
Why You’ll Love These BBQ Bacon Bombs
There’s a lot to love about this easy ground beef recipe.
Cheesy center: A cube of cheddar melts inside every bacon bomb, creating a rich, gooey surprise.
Crispy bacon: Wrapping each beef ball in thin-cut bacon gives the outside a savory, smoky flavor and delicious texture.
Smoky BBQ flavor: BBQ sauce adds sweetness, tanginess, and a deep smoky finish.
Easy to prepare: The ingredients are simple, and most of the work involves mixing, stuffing, wrapping, and baking.
Perfect for entertaining: These are easy to serve as an appetizer or hearty party food.
Make-ahead friendly: Assemble them in advance, refrigerate, and bake when you’re ready.
Recipe Overview
Recipe: Cheddar-Stuffed BBQ Bacon Bombs
Prep Time: 20 minutes
Cook Time: 25–30 minutes
Resting Time: 5 minutes
Total Time: About 50–55 minutes
Servings: 12 bacon bombs
Calories: Approximately 250–300 per serving, depending on ingredients used
Ingredients You’ll Need
- 1 pound ground beef
- 8 ounces cheddar cheese, cut into 12 small cubes
- 12 slices thin-cut bacon
- 1/2 cup BBQ sauce, divided
- 1/4 cup finely diced yellow onion
- 1 teaspoon garlic powder
- 1 teaspoon smoked paprika
- 1/2 teaspoon onion powder
- 1/2 teaspoon salt
- 1/2 teaspoon black pepper
- 1 tablespoon Worcestershire sauce
- 1/4 cup breadcrumbs
Choosing the Right Ingredients
For the best results, use ground beef with enough fat to keep the meat juicy while it cooks. A moderately lean ground beef works especially well.
Thin-cut bacon is recommended because it wraps more easily around the meatballs and has a better chance of becoming crisp during baking.
Sharp cheddar gives you a stronger cheese flavor, while mild or medium cheddar creates a smooth, creamy center. You can also experiment with other melting cheeses depending on what you have available.
For the BBQ sauce, choose your favorite bottled variety. A smoky or slightly sweet sauce works particularly well with the beef and bacon.
How to Make Cheddar-Stuffed BBQ Bacon Bombs
1. Prepare the Oven
Preheat your oven to 400°F.
Line a large baking sheet with foil or parchment paper for easier cleanup. If you have a wire rack that fits inside the baking sheet, place it on top. The rack allows some of the bacon fat to drip away and helps the bacon cook more evenly.
2. Make the Seasoned Beef Mixture
Place the ground beef in a large mixing bowl. Add the diced onion, garlic powder, smoked paprika, onion powder, salt, black pepper, Worcestershire sauce, and breadcrumbs.
Gently mix everything together until the seasonings are evenly distributed.
Try not to overmix the meat. Working the beef too much can make the finished bacon bombs dense instead of tender.
3. Stuff Each Bomb With Cheese
Divide the beef mixture into 12 roughly equal portions.
Take one portion and flatten it gently in the palm of your hand. Place one cheddar cube in the center.
Carefully bring the beef around the cheese, completely covering it. Roll the meat between your hands until you have a smooth ball.
Check the surface carefully for cracks or exposed cheese. The beef needs to form a complete seal around the cheddar. This helps prevent the cheese from escaping while the bacon bombs bake.
Repeat with the remaining beef and cheese.
4. Wrap Each One With Bacon
Take one slice of bacon and wrap it around a stuffed beef ball.
Depending on the size of your bacon slices, you may need to slightly stretch the bacon as you wrap. Place each bacon-wrapped ball seam-side down on the prepared rack.
Keeping the seam underneath helps hold the bacon in place while it cooks.
5. Add the BBQ Sauce
Brush the bacon bombs with some of the BBQ sauce, reserving the remaining sauce for later.
Don’t coat them too heavily at this stage. A thick layer of sauce can make it harder for the bacon to become crisp.
6. Bake Until Cooked Through
Place the baking sheet in the preheated oven and bake for approximately 25 to 30 minutes.
Cooking time can vary depending on the size of the bacon bombs and your oven, so the safest way to determine doneness is to check the internal temperature of the beef.
The center should reach 160°F.
7. Finish With More BBQ Sauce
During the final few minutes of cooking, brush the bacon bombs with another layer of BBQ sauce.
If you want a darker, crispier exterior, you can switch the oven to broil for about 1–2 minutes. Watch them closely because BBQ sauce contains sugar and can burn quickly.
8. Let Them Rest
Remove the bacon bombs from the oven and let them rest for about 5 minutes before serving.
This short resting period allows the juices to settle and gives the melted cheddar a chance to cool slightly, making them easier to eat.
Helpful Tips for Perfect Bacon Bombs
Seal the cheese completely. This is the most important step. Any cracks in the beef can create an opening for the melted cheddar to escape.
Use thin-cut bacon. Thick bacon can take longer to crisp and may be more difficult to wrap securely around the beef.
Don’t overmix the meat. Mix just until the ingredients are combined for a more tender texture.
Keep the cheese cubes small. Large pieces of cheese may be more difficult to cover completely.
Go easy on the first layer of BBQ sauce. Too much sauce too early can prevent the bacon from crisping properly.
Use a meat thermometer. Since ground beef should reach 160°F, checking the internal temperature is more reliable than judging doneness by appearance alone.
Delicious Variations
These BBQ bacon bombs are easy to customize.
For a spicy version, use Pepper Jack cheese and add finely diced jalapeños to the beef mixture. You can also use a spicy BBQ sauce.
For extra smoky flavor, try smoked cheddar and a smoky barbecue sauce.
If you love onions, add a little more finely diced onion or use caramelized onions inside with the cheese.
You can also replace cheddar with Monterey Jack, Colby Jack, Gouda, or smoked cheddar.
For a lighter option, ground turkey can replace ground beef. Keep in mind that turkey has a milder flavor and can be somewhat leaner.
What to Serve With BBQ Bacon Bombs
These cheesy bacon bombs are filling enough to serve as the centerpiece of a casual dinner, but they also make an excellent appetizer.
Serve them alongside:
- Creamy coleslaw
- Potato salad
- French fries
- Sweet potato fries
- Baked beans
- Corn on the cob
- Macaroni and cheese
- Green salad
- Pickles and sliced vegetables
Set out a small bowl of warm BBQ sauce for dipping. Ranch dressing or a spicy dipping sauce can also be served on the side.
Make-Ahead Instructions
You can prepare these bacon bombs up to 24 hours in advance.
Assemble the stuffed beef balls and wrap each one with bacon. Place them in a covered container or tightly cover the baking tray and refrigerate until you’re ready to cook.
When ready, bake according to the recipe instructions. Since they will be cold from the refrigerator, they may require a few additional minutes in the oven. Always check that the center reaches 160°F.
How to Store Leftovers
Store leftover BBQ bacon bombs in an airtight container in the refrigerator for 3–4 days.
For the best texture, reheat them in a 375°F oven or air fryer until heated through. The air fryer is especially useful because it helps bring back some of the bacon’s crisp texture.
You can also freeze the bacon bombs before cooking. Wrap them well and store them in a freezer-safe container for approximately 2–3 months for the best quality.
Frequently Asked Questions
Can I use a different type of cheese?
Absolutely. Pepper Jack, Monterey Jack, Colby Jack, Gouda, and smoked cheddar are all delicious options. Choose a cheese that melts well.
Why did my cheese leak out?
The most common reason is that the beef wasn’t completely sealed around the cheese. Before wrapping each piece with bacon, inspect the beef for cracks or thin spots and gently seal them.
Can I make these spicy?
Yes! Add diced jalapeños to the beef mixture, use Pepper Jack cheese, or choose a spicy BBQ sauce.
Can I use ground turkey instead of beef?
Yes. Ground turkey works as a substitute, although the finished bacon bombs will have a lighter flavor. Be sure to cook the center to the appropriate safe temperature.
Can I make them in an air fryer?
Yes. Air-fryer bacon bombs can be cooked at around 375°F. Because air fryers vary, use an instant-read thermometer to confirm the center reaches 160°F.
Final Thoughts
These Cheddar-Stuffed BBQ Bacon Bombs bring together everything you want in a fun comfort-food recipe: juicy seasoned beef, crispy bacon, smoky BBQ sauce, and melted cheddar hiding in the center.
They’re easy enough for a weeknight dinner but special enough for game day, cookouts, parties, and family gatherings. Once you master the basic method, you can change the cheese, seasonings, and BBQ sauce to create your own favorite combination.
Serve them hot with plenty of dipping sauce and your favorite classic sides. Just be prepared—once your guests cut into that cheesy center, these bacon bombs are likely to disappear fast!